
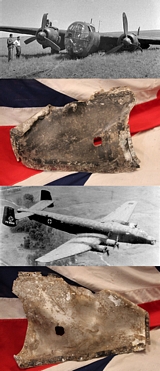
A Large Original Recovered Piece of a WW2 German Crashed Bomber's Alloy Wing Top Panel
Taken from a crashed German bomber, with original wing-top paint. Numerous rivet holes and rivet heads present. Typical german wing-top paint for a bomber aircraft. There is a partial printed word on the underside and with dilligent research it should be traceable to a specific bomber type.
Over the years we have had some amazing aeronautical archeological finds, and most have been identified by their approved, and gov. registered recoverers, yet this fine piece was placed in storage, and it’s plane I’d was mislaid, so the research for it has to start again if it is needed, but the price reflects that, and it may well reveal wonderful results.
14.75 inches x 22.0 inches. Just over 3.5 pounds weight. read more
395.00 GBP
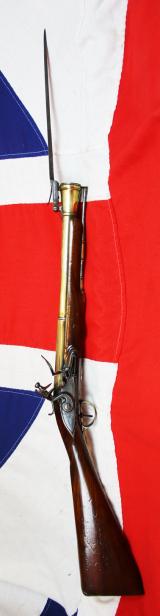
A Superb Royal Naval, Brass Cannon Barrel Blunderbuss With Finest 'Juglans Regia' Walnut Stock Spring Bayonet, Elaborately Engraved All Brass Furniture, by Daykin of Nottingham
More photos to add tomorrow.
Manufactured circa 1780, this is an jolly rare example of a brass, cannon barreled blunderbuss, from the mid Georgian period, with a sprung loaded, quick-release snap-bayonet. Overall in superb condition for age.
A hugely popular gun used aboard naval ships by their captains in the era of King George IIIrd during the American Revolution and including the Napoleonic Wars, from the days of Admiral Nelson's Victory at Trafalgar. The rarest of the types used had a spring loaded bayonet that was incredibly effective for use after the blunderbuss had discharged its load against any 'boarders', and to effect the 'coup de gras' {the stroke of grace} to those that are still determinedly putting up a fight against the British ship's captain.
The three-stage round barrel has a flared muzzle and turned moldings. The sprung bayonet is fitted beneath, and the ramrod is housed to left side. The right side of the breech is struck with Tower private proof marks and the maker’s mark. The engraved action is signed "Daykin" and the barrel engraved " Daykin Nottingham" the blunderbuss has finest and elaborately engraved brass fittings, including the trigger guard. with a beautiful acorn finial.
The figured walnut buttstock it mounted with an engraved brass buttplate. The ramrod is in traditional naval service steel
The Blunderbuss (born of the Dutch word "Donderbus", appropriately meaning "Thunder Pipe" or "Thunder Gun") came to prominence in the early part of the 18th Century (1701-1800) and was more akin to the modern day shotgun than a "long gun" musket or heavy pistol of the time. As such, she excelled in close-in fighting, be it within the confines of naval warfare or walled nature of the urban environment, such as for protection of a Royal Mail coach, where her spread of shot could inflict maximum damage to targets at close ranges. Its manageable size, coupled with its spread shot, ensured some level of accuracy for even the novice user and its appearance was rather intimidating to those unfortunate enough to be staring down the business end, and the flashing bayonet nicely finished off those that survived the first salvo of shot! As with modern firearms, the Blunderbuss also made for an excellent security-minded weapon and soon found popularity amongst all matter of operators - military, civilian and, of course, criminal parties - by the middle of the 1700s. Even George Washington championed the Blunderbuss for Continental Army "Dragoon" units of the burgeoning American military as opposed to the carbine this being nothing more than a full-featured long gun of lesser overall length, proving suitable for horse-mounted handling. In fact, the short-form version of the Blunderbuss came to be known as the "Dragon", giving rise to the term "Dragoon" for such gun-wielding cavalrymen. Dragoons went on to form specialized units of mounted infantrymen within their respective armies during the end of the 17th Century and into the middle of the 18th Century - in a way, becoming an evolutionary step of the fabled mounted knight of the Middle Ages. Their use of Dragons soon gave way to the widely-accepted carbine musket. The Blunderbuss was also known as the "Blunderbess"
As with all our antique guns no license is required as they are all unrestricted antique collectables
The stock is superb with some edge bruising etc. around the lock. read more
3850.00 GBP
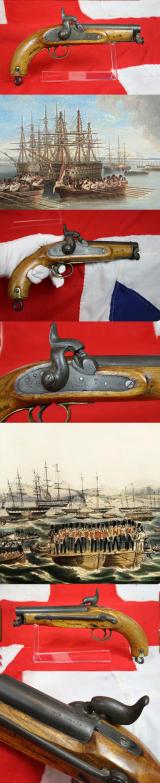
A Rare Crimean War Issue, P1839 Tower of London Royal Naval Sea Service Pistol, In Spectacular, As issued Condition, With Original Finish, Blue and Stock Varnish. Positively and Profusely Stamped & Ordnance Marked, With Numerous Inspection Marks
VR Crown Tower lock with date 1855, stock maker marked by the ordnance contractor.
The new Pattern 1839 Sea Service Pistol, was a single shot percussion action sidearm with a captive ramrod, and was adopted for use by the Royal Navy from 1839. This pistol was nearly identical to the Pattern 1839 British Naval Coast Guard Pistol, but with two significant exceptions. First, the calibre was reduced to 26-Bore (about .57 caliber) and secondly, the pistol was mounted with an additional conventional belt hook rather than just the butt swivel. One other change was the elimination of the bolted safety behind the cock.
The list below was of the ships of the Royal Navy, issued with this pistol for use in the Crimean war, alongside their launch dates.
Arrow-class gunvessel
HMS Agamemnon (1852)
HMS Ajax (1809)
HMS Amphion (1846)
HMS Arrogant (1848)
HMS Ardent (1841)
HMS Basilisk (1848)
HMS Beagle (1854)
HMS Belleisle (1819)
HMS Blenheim (1813)
HMS Boscawen (1844)
HMS Britannia (1820)
HMS Calcutta (1831)
HMS Cornwallis (1813)
HMS Cossack (1854)
HMS Cruizer (1852)
HMS Cumberland (1842)
HMS Cyclops (1839)
HMS Dauntless (1847)
HMS Driver (1840)
HMS Duke of Wellington (1852)
HMS Edinburgh (1811)
HMS Euryalus (1853)
HMS Eurydice (1843)
HMS Exmouth (1854)
HMS Gorgon (1837)
HMS Hornet (1854)
HMS Imperieuse (1852)
HMS James Watt
HMS La Hogue
HMS Leander (1848)
HMS London (1840)
HMS Majestic (1853)
HMS Merlin (1838)
HMS Miranda (1851)
HMS Monarch (1832)
HMS Neptune (1832)
HMS Nile (1839)
HMS Odin (1846)
HMS Orion (1854)
HMS Pique (1834)
HMS Prince Regent (1823)
HMS Princess Royal (1853)
HMS Queen (1839)
HMS Rodney (1833)
HMS Royal George (1827)
HMS Sans Pareil (1851)
HMS St Jean d'Acre
HMS Tartar (1854)
HMS Tiger (1849)
HMS Valorous (1851)
HMS Virago (1842)
HMS Vulture (1843)
The 1839 Sea Service pistols, and WD contract Colt Navy revolvers, were also used in service by the Navy and Marines in the Second Opium War in China.The Colt revolvers for use by the officers, and the sailors and Marines, the single shot sea service pistols.
The Second Opium War, which brought English Camp's Royal Marines to Guangzhou, started after the Chinese seized a suspected pirate ship that was registered as a British merchant vessel, and the murder by the Chinese of a French priest. In retaliation, Britain made an alliance with France began destroying Chinese forts and eventually gathered an international force that would include British, French, and American combatants. This war would last for four years and climaxed with the burning and looting of the Summer Palace in Beijing, shortly after the Royal Marines arrived at English Camp. The Americans joined as allied combatants in the war, but didn’t make a formal alliance with the Anglo French force. read more
1450.00 GBP

A Pair Of Finest Irish Silver Mounted Holster Pistols By John Govers Of Dame St. Dublin 1760. Finest Silver Cartouches Each One Engraved With The Original Owner, An Irish Duke's, Noble Crests, Of Irish Ducal Crowned Lions Passant, Set In Noble Shields
John Gover is recorded working in Dame Street, Dublin between 1745 and the year of his death in 1774. 18 bore.
Bearing upon their silver noble shield cartouches with grotesque masks at the shield base, are engraved noble crests of an Irish, ducal crowned lions passant, standing with one paw raised, over two heraldic bars.
A superb pair of silver grotesque mask butt caps, and all over silver fittings of florid designs including, pieced sideplates of stands of arms, including cannon, flags, cuirass armour, cannon balls and axes. Also very fine silver trigger guards with florid finials and fine engraving, and a pair of silver ramrod pipes containing their original horn tipped rammers.
Grotesque mask butt caps on antique flintlock pistols primarily feature human-like caricatures, mythological beasts, and stylized theatrical faces. These ornamental metal caps—commonly made of silver, brass, or German silver—were most popular on 17th- and 18th-century European and American firearms, especially Queen Anne and pocket pistols.
Exaggerated human features with wide-open mouths, prominent noses, and furrowed brows, often modeled after architectural gargoyles.
Designs inspired by Greco-Roman theatre masks, woodland spirits, or symbolic "death demons" meant to ward off evil
A pistol grotesque butt mask was one of the very few of its kind recovered from colonial excavation sites throughout Maryland, USA, is important not only for what it is, but for what it represents. While no other gun parts were recovered from Site 18CH354, the grotesque butt cap represents ideologies and traditions transferred from the old world to the new, and characterized how these ideas spread up through the Revolution (Gusler & Levin 1977).
These are truly a beautiful pair of finest status pistols from the mid 18th century, from the era of great turmoil across the Atlantic in the Americas, the Anglo Indian French War {aka the 7 years war in } and simply a joy to behold. The Metropolitan Museum in America have numerous similar wondrous examples in their collection, carried by the high ranking English and American officers {colonels and generals} in both the 1760’s war and the subsequent War of American Independence in the 1770’s to 80’s. The wars where George Washington first fought as British colonel against the French, then as General, the commander of the American forces, the Continental Army, against his former natural loyalties to the crown. The American Revolution, historically, was one of the most formative for world history until the 20th century world wars.
A war, that by defeating the British forces, by mostly former British colonists and crown subjects, along with elements of European emigres, and, the considerable assistance by the Britain’s greatest rivals at the time, France, creating, arguably, the most powerful nation of earth, in the much later 20th and 21st centuries. And, the other consequences, spawned the French Revolution, thus assisting Britain to expand the British Empire, and creating the worlds greatest power for the next 140 years until the 20th century, when America took its place, but only thanks to Germany, another of France’s great rivals.
The King of France expended so much gold from the French treasury, in loans and assistance to American revolutionaries, that it bankrupted the King, and naturally, France. Entirely, in many respects, due to the fact America, simply refused to pay back any financial contribution King Louis had made, and thus, creating the groundwork for his revolution, that cost him, and the nobility of France, their heads.
Ironically it was the French Kings ability to expend his vast resources against his government wishes, that lost him his realm, and it was the English kings inability to stop the war, as he was firmly against the British governments policy of the war, as he was a constructional monarch, thus head of state in name, but with no effective power to control policy or his governments wishes, that helped to create the most popular royal family in the world.
Another great irony, was, all the blame by America was heaped upon the British King George IIIrd, {the so-called, king of tyranny} to enable the circumstances of the war, but, he was one of the few men of ‘power’ in Britain that supported their situation, of course, behind the scenes so to speak, but, could do nothing about it. He was in reality, one of the kindest of men to have every ruled {in name only} a great nation, known by his beloved subjects as ‘Farmer George’, due to his passion of working hand in hand with his estate labourers, who he regarded as friends, digging ditches and tending animals.
Thus the French Kings action cost him his families throne, and lives, and the British Kings lack of action, went on the create the worlds greatest empire of the 19th and early 20th century. A lesson on the advantages of constitutional monarchies no doubt.
The previous few paragraphs, if you kindly forgive our wandering narrative, show, very briefly, and concisely of course, and naturally we had to leave out a few other minor historical events {around sixty ‘lesser’ wars, but whose counting} that just how intriguing and fundamental history truly is to all future events. The ultimate demonstration of ‘actions and consequences’ and what the studying of history can truly reveal to the curious mind. All current presidents and prime ministers, please take note!
See the most interesting and illuminating article of the pistol grotesque butt cap mask of the early 18th century
https://apps.jefpat.maryland.gov/curatorschoice/CCIssues/2010-11.aspx
Each pistol is 14 inches long overall with barrels of 8 1/4 inches overall condition is very good with usual commensurate age wear and small areas of dings and nicks to the walnut stocks around the locks. read more
5950.00 GBP

A Magnificent Pair of 18th Century London, Silver Mounted Long Holster Pistols Circa 1720, By George Halfhide of The Minories London. Elected Master of the London Gunmakers Company in 1736
A wondrous pair of finest English silver mounted, 25 bore long barrelled, holster or horse pistols, by one of the great London makers of early Georgian England.
George Halfhide was a master gunsmith. and accordingly held in most high esteem, to such an extent, he was elected master of the gunmakers company in 1737. A highly prestigious position, carrying much responsibility and enormous respect within the trade.
He is renowned for making the finest pistols for the nobility and gentry of society in the earliest Georgian period of the 1700s. His silver mounts were finest quality for the time, and his carving and wood crafting always exemplary. The pistols are mounted with silver grotesque butt caps of extraordinary beauty.
These are an exceptional pair of such silver mounted pistols and are in fine condition for their age. with the usual wear commensurate for their date.
Long barrel holster pistols were in much great demand and in their day were extraordinary expensive. They could be carried in saddle mounted buckets (the earliest name for holsters) when mounted on horseback.
Made before the days of duelling pistols, but is from their size and design that pairs of cased duelling pistols evolved into later society in Georgian England.
Grotesque mask butt caps on antique flintlock and wheellock pistols primarily feature human-like caricatures, mythological beasts, and stylized theatrical faces. These ornamental metal caps—commonly made of silver, brass, or German silver—were most popular on 17th- and 18th-century European and American firearms, especially Queen Anne and pocket pistols.
Exaggerated human features with wide-open mouths, prominent noses, and furrowed brows, often modeled after architectural gargoyles.
Designs inspired by Greco-Roman theatre masks, woodland spirits, or symbolic "death demons" meant to ward off evil
A pistol grotesque butt mask was one of the very few of its kind recovered from colonial excavation sites throughout Maryland, USA, is important not only for what it is, but for what it represents. While no other gun parts were recovered from Site 18CH354, the grotesque butt cap represents ideologies and traditions transferred from the old world to the new, and characterized how these ideas spread up through the Revolution (Gusler & Levin 1977).
See the most interesting and illuminating article of the pistol grotesque butt cap mask of the early 18th century
https://apps.jefpat.maryland.gov/curatorschoice/CCIssues/2010-11.aspx
Overall 17 3/4 inches long, 11 1/4 inch barrels
One hammer is slightly out of true with a hairline, one forestock has an old contemporary split repair read more
7500.00 GBP

A Superb Pair of 18th Century Naval Ship Captain's Pistols, Dated 1783, with All Brass Frames and Barrels and Hallmarked Silver Buttcaps. By Master Gunsmith John Rea of London
American revolutionary war period and used into the Napoleonic Wars.
John Rea was an 18th-century London gunsmith who operated and produced fine antique firearms, notably Royal Navy form pistols and brass cannon-barrel blunderbusses.
Boxlock actions with sliding safeties, very tight and crisp strong actions. Shield form butt cartouches, with solid silver buttcaps.
The quality of these pistols is beyond improvement, as is their condition.
He was active in London from 1782 to 1793.
Associated with classic British maritime personal defense arms of the Georgian era.
Noted for producing "cannon mouth" pattern brass-barreled blunderbusses featuring Tower proof marks and fine walnut stocks.
Utilized high-grade brass furniture, finely engraved trigger guards, and robust flintlock mechanisms suited for close-quarters naval defense actions read more
3600.00 GBP

An 1801 Pattern, Tower of London, Royal Navy Issue, Long ‘Sea Service Pistol’, Tower of London GR Crown Lock, Fine Stock & 'Skull Crusher' Butt Cap, From The Battle Of Trafalgar Historic Nelson Period, Stock Dated 1803
A very fine example indeed, profusely stamped.
Profusely struck with numerous ordnance and inspectors marks, fairly clearly issue date stamped 1803 into the stock, without belt hook. Some belt hooks were removed in service.
The 'Skull Crusher' butt cap was so called as once the shot was discharged at the enemy, in close hand-to-hand combat, there was no time to re-load, so the pistol was turned around, and firmly held in the left hand, by the barrel, and thus used as a stout club, and used for exactly the same purpose. The right hand, once free, could then hold a cutlass or sword, simultaneously.
Lock stamped Tower and GR Crown, but with wear, so now faded from distinct view. Also, with clear ordnance inspector stamp of Crown 2. The primary, senior Tower ordnance inspector, Richard Duce {his mark of Crown 2}. Who was also the controller of tempering & hardening of locks,
Fantastic patina to the stock. The King George IIIrd issue British Royal Naval Sea Service pistol has always been the most desirable and valuable pistol sought by collectors, but this example, like our previous 1801 sea service pistol, {sold last year} is truly exceptional.
Exactly as issued and used by all the British Ship's-of-the-Line, at the Battle of Trafalgar in 1805.
Such as;
HMS Victory,
HMS Temeraire,
HMS Dreadnought,
HMS Revenge,
HMS Agamemnon,
HMS Colossus
HMS Leviathan &
HMS Achilles.
Some of the most magnificent ships, manned by the finest crews, that have ever sailed the seven seas.
Battle of Trafalgar, (October 21, 1805), naval engagement of the Napoleonic Wars, which established British naval supremacy for more than 100 years; it was fought west of Cape Trafalgar, Spain, between Cádiz and the Strait of Gibraltar. A fleet of 33 ships (18 French and 15 Spanish) under Admiral Pierre de Villeneuve fought a British fleet of 27 ships under Admiral Horatio Nelson.
At the end of September 1805, Villeneuve had received orders to leave Cádiz and land troops at Naples to support the French campaign in southern Italy. On October 19–20 his fleet slipped out of Cádiz, hoping to get into the Mediterranean Sea without giving battle. Nelson caught him off Cape Trafalgar on October 21.
Villeneuve ordered his fleet to form a single line heading north, and Nelson ordered his fleet to form two squadrons and attack Villeneuve’s line from the west, at right angles. By noon the larger squadron, led by Admiral Cuthbert Collingwood in the Royal Sovereign, had engaged the rear (south) 16 ships of the French-Spanish line. At 11:50 AM Nelson, in the Victory, signaled his famous message: “England expects that every man will do his duty.” Then his squadron, with 12 ships, attacked the van and centre of Villeneuve’s line, which included Villeneuve in the Bucentaure. The majority of Nelson’s squadron broke through and shattered Villeneuve’s lines in the pell-mell battle. Six of the leading French and Spanish ships, under Admiral Pierre Dumanoir, were ignored in the first attack and about 3:30 PM were able to turn about to aid those behind. But Dumanoir’s weak counterattack failed and was driven off. Collingwood completed the destruction of the rear, and the battle ended about 5:00 PM. Villeneuve himself was captured, and his fleet lost 19 or 20 ships—which were surrendered to the British—and 14,000 men, of whom half were prisoners of war. Nelson was mortally wounded by a sniper, but when he died at 4:30 PM he was certain of his complete victory. About 1,500 British seamen were killed or wounded, but no British ships were lost. Trafalgar shattered forever Napoleon’s plans to invade England.
Obviously this arm has signs of combat use and the stock has minor dings. But when taken into consideration its service use, it is of little consequence compared to it's condition, which is truly exceptional.
It still has it's original 12" barrel, which is very scarce as the barrels were shortened by official order, to 9", before the Napoleonic wars. Overall in very nice order, good tight action, one sideplate screw-head is half lacking read more
3495.00 GBP

The Lanes Armoury, View Europe’s Leading Original Samurai Sword Gallery. Plus, 1000’s of Other Magical & Rare To Find Ancient and Vintage Wonders. Another Historic Collection Acquired This Week, Including Amazing, Historical, Royal Naval Collectables
View online and in our gallery, hundreds and hundreds of original antique and ancient samurai swords, armour, and spears.
For those of you that are serious maritime collectors, we have the privilege to have acquired a superb and historical 20th century Royal Naval sword, that has just arrived, a stunning named officer’s sword of former member of the tragic HMS Hood’s ships company. HMS Hood was an Admiral-class battlecruiser and the largest warship in the Royal Navy for 20 years. Affectionately known as "The Mighty Hood," she served as a potent global symbol of British power. During World War II, a fatal shell from the German battleship Bismarck struck her in May 1941, causing a catastrophic explosion that claimed 1,415 lives. Probably the most infamous sinking of a British warship in history. A naval tragedy almost beyond comprehension for the people of Britain at the time. On May 24, 1941, HMS Hood and the battleship HMS Prince of Wales intercepted the German battleship Bismarck and cruiser Prinz Eugen in the Battle of the Denmark Strait. During the engagement, a single shell from the Bismarck pierced Hood's armour and detonated her internal magazines. The ship broke apart and sank in just minutes. Tragically, there were only three survivors from a crew of 1,418
A KIA officer whose brother was also part of the Hood’s crew, who was lost at sea in its last great combat sinking. Both brothers were lost at sea in WW2, one on the Mighty Hood, the other, who had earlier transferred off the Hood, to serve as Lt. of a submariner crew, was also lost at sea, in its own tragic sinking off the Italian coast.
At the moment it is being no expense spared cleaned and conserved for future posterity. We are considering adding this sword to be a part of our family collection.
Including lots of other unique treasures, such as, a fabulous, early, and large, polished rock crystal quartz witch ball, with breathtaking internal clarity and patterns.
Our weekly emailer was due out this weekend, however, we were absorbed in the arrival of another collection that consumed all our time sadly, so it will be sent out early this coming week {with some fabulous new pieces}
This week a stunning collection of many superb pairs of 18th century flintlock pistols, and brass barrelled blunderbusses, they will be added to the site over the next week or so after cleaning and museum grade conservation.
Also, to be added this coming week, an 18th century naval midshipman’s dirk, a naval brass barrelled blunderbuss with spring bayonet, a Royal Naval Trafalgar sea service flintlock, a Crimean War sea service percussion pistol, and pair of naval ships captains brass barrelled flintlock pistols, plus, another small collection of original James Bond, Ian Fleming, 1960's Ist editions, added recently, and numerous original WW2 German combat awards, taken as war booty by one of Lt Commander Ian Fleming's 'Red Indians', the 30 Assault Commando's, operation in 'behind the lines' clandestine ops in occupied France. Also, a fabulous Napoleonic 1st Empire library clock designed on the bookcases in Napoleon's palace the Palais Des Tuileries. {This beauty was just sold after one day online}. And, an incredible 500 plus year old samurai sword from one of the great swordsmith lines of the Mino-Den, with an incredibly rare 'Summer Lightning' hamon, only created by the great master swordsmiths. {Also sold the same day it was put online}
Just the other day we further acquired a fabulous, and rare, SOE secret agent's WW2 suitcase transceiver. As used by the legendary, clandestine operatives and heroines of WW2, Odette Churchill and Violette Szabo.
Just the other week one visiting couple from the States, a retired Yale professor and his wife, very kindly remarked:
" We have just spent five weeks travelling the UK, visiting all the great tourist sites, museums and castles, but, nothing, simply nothing, was as amazing and fascinating as the collection your store, congratulations, well done, and keep up the good work"
Thanks to us being so long established here in Brighton we are contacted or visited every day by private families interested in selling their long past collected antiques and antiquities.
Artefacts of all kinds, from all eras and all nations are offered to us every single day. Some collected by their ancestors hundreds of years ago. And this week has been particularly fascinating for the diversity and beauty of our finds.
After more than 55 years personal experience by Mark, the elder partner, in our galleries, since 1971, and David’s 45 years since 1981, we are also regarded by many as Europe’s leading original samurai sword gallery, and probably the leading samurai sword specialists in the world, outside of Japan.
With hundreds of original ancient and antique samurai swords to view and buy online, or, to journey to our world famous gallery in Brighton on a personal visit, 6 days a week.
By train we are just under an hour from Victoria Train Station in London.
It has been said that the Hawkins family, have, in their sword dealing history, handled, bought and sold more original Japanese swords than any other sword dealers outside of Japan since World War I, trading over 100 years, numbering well into the tens or even hundreds of thousands of samurai weapons and artefacts. In one single acquisition alone, in the early 1960’s, David senior {the current partner’s father} purchased, in one collection, over 500 original antique and vintage Japanese swords, and Mark helped to disassemble each and every one of them, and was in charge of stringing together the tsuba sword guards into string mounted loops, 20 at a time. In those days tsuba were more collectable than swords. It was one of Mark’s very first introductions to the workings of the wonderful works of art that make up a complete samurai sword.
He can still remember listening to the very first hit of the Beatles ‘Love me do’ on the radiogram, in late 1963, while stringing together 25 loops of 20 tsuba, before he started school that early morning.
Our close family association with the legendary samurai sword continues unabated. In fact we still know of no better and varied original samurai sword selection, for sale under one roof, anywhere in the world today, outside of Japan, or possibly, even within it. Hundreds of antique pieces for sale to choose from, and some up to an incredible 800 years old.
Why is The Lanes Armoury probably the worlds most popular, original Japanese samurai gallery?
Well, we believe that not only are we the oldest still thriving store of our kind outside of Japan, but we have an entirely historical view of all our samurai artefacts, be they armour, helmets, swords, spears or accoutrements,
We place each piece within its historical context, a unique, holistic view if you like, never concentrating on such as simply the minutiae of blade detail alone {that has never been our forte} but of the entire sword as a work of art, and an example of the worlds highest craftsmanship, and thus it’s potential place within all of over 1000 years of samurai history.
Can they be expensive?
Well, they certainly can appear so, however up to 70% of our completely fitted swords may still be half the price of just a newly made sword blade alone, commissioned from one of the few still remaining fine sword smiths in Japan, and ours could well be up to 500 years old, completely and stunningly fitted in fabulous quality original antique mounts, and potentially used in the past by up to 30 samurai within their own working life and history. And yet, they can still look as good as new.
A samurai sword for example, is in many respects, more the sum of its parts, although always dated by its blade’s vintage, each sword can have amazing koshirae mountings of equal beauty to the blade, displaying the skill of likely the most talented artisans in sword making history, and representing the most intriguing and certainly one of the most popular forms of ancient hand to hand combat in the world today.
For example one of the greatest films ever made in the history of cinema is Akira Kurosawa’s 1954 “Seven Samurai”. A groundbreaking epic of such influence on modern cinemas it is said to inspired more films in its genre than any other film ever made. A well deserved masterpiece of cinema, based entire on a simple single event of legendary samurai combat.
Still today, more incredible films in the genre are made involving the legendary samurai sword than any other, such as some of the billion dollar epics made by the Marvel Universe, that still enthral the worlds movie watching audiences.
There is no other country in the world that continually used the very same form of weaponry, in hand to hand combat, for over 800 years. A samurai sword of around 800 years of age, would be just as recognisable and as usable to any 19th century samurai, or even current exponent of samurai martial arts, if he were alive today.
As once told to us by an esteemed regular visitor to us here in our gallery, Victor Harris, in order to study and discuss our extensive collection, and he used the same words that are repeated in his book below;
“In these textures lies an extraordinary and unique feature of the sword - the steel itself possesses an intrinsic beauty. The Japanese sword has been appreciated as an art object since its perfection some time during the tenth century AD. Fine swords have been more highly prized than lands or riches, those of superior quality being handed down from generation to generation. In fact, many well-documented swords, whose blades are signed by their makers, survive from nearly a thousand years ago. Recognizable features of the blades of hundreds of schools of sword-making have been punctiliously recorded, and the study of the sword is a guide to the flow of Japanese history.”
Victor Harris
Curator, Assistant Keeper and then Keeper (1998-2003) of the Department of Japanese Antiquities at the British Museum. He studied from 1968-71 under Sato Kenzan, Tokyo National Museum and Society for the Preservation of Japanese Swords
Finally, a visit to The Lanes Armoury is considered and remarked upon, by near every single visitor to our store, numbering thousands of people every day, that is is an unforgettable experiance, and every samurai sword buyer is afforded the best possible attention, not just for the time that they may view, choose, and buy a sword, but for as long as they own the sword. We are available for every aspect of ownership to its new owner, essentially, forever. Our world renown 5 Star service knows no time limit.
And be assured, every single item, from a cap badge to a 800 year old ancient samurai sword, to an Ancient Greek solid gold crown, will be accompanied with our unique Certificate of Authenticity. Based on over 100 years and four generations of experience. read more
Price
on
Request

A Fine, Original, 19th Century Antique, King George IIIrd Carved Hound's Head Long Bladed Swordstick. Carved Ivory Head & Blue and Gilt Finely Engraved Steel Blade. Finest Quality Bamboo Handle and Haft
Overall in stunning condition for age, as much a work of art as a former, functional, walking cane sword. Likely made in the same era, and possibly by the same maker as Lord Byron's swordstick
Lord Byron's was a most exponent of the use and carrying of the gentleman’s sword stick. His was exhibited in King's College London, bearing a mercurial gilt collar bearing his name, coronet and adopted surname Noel. Upon the death of Byron's mother-in-law Judith Noel, the Hon. Lady Milbanke, in 1822, her will required that he change his surname to "Noel" so as to inherit
An interesting 19th century conversation and collector's piece, and one can ponder over of the kind of gentleman who would have sought and required such a piece of personal defence paraphernalia. Although one likes to think that jolly old England had a London full of cheerful cockneys and laddish chimney sweeps, it was also plagued with political intrigue, nefarious characters and caddish swine prowling the endless foggy thoroughfares and dimly lit passageways. The swordstick was a popular fashion accessory for the wealthy during the 18th and 19th centuries. While the weapon's origins are unknown, it is apparent that the cane-sword's popularity peaked when decorative swords were steadily being replaced by canes as a result of the rising popularity of firearms, and the lessening influence of swords and other small arms.
The first sword canes were made for nobility by leading sword cutlers. Sixteenth century sword canes were often bequeathed in wills. Sword canes became more popular as the streets became less safe. Society dictated it mandatory that gentlemen of the 18th and especially 19th centuries would wear a cane when out and about, and it was common for the well-dressed gentleman to own and sport canes in a variety of styles, including a good and sound sword cane. Although Byron was proficient in the use of pistols, his lameness and his need to defend himself in some potentially dangerous situations made a swordstick doubly useful to him. He received lessons in London from the fencing master Henry Angelo and owned a number of swordsticks, some of which were supplied by his boxing instructor Gentleman John Jackson.
On Byron’s sword cane was the name NOEL BYRON, upon the ferrule of his one indicated that it was used after 1822, when Byron added the surname Noel after the death of his mother-in-law.
There are several references to sword sticks in the correspondence of Byron and his circle. Byron wrote to Hobhouse from Switzerland on 23 June 1816 asking him to Bring with you also for me some bottles of Calcined Magnesia a new Sword cane procured by Jackson he alone knows the sort (my last tumbled into this lake ) some of Waite's red tooth-powder & tooth-brushes a Taylor's Pawrsanias Pausanias and I forget the other things. Hobhouse responded on 9 July: Your commissions shall be punctually fulfilled whether as to muniments for the mind or body pistol brushes, cundums, potash Prafsanias Pausanias tooth powder and sword stick.
In the entry for 22 September 1816 in Byron's Alpine Journal he describes how, at the foot of the Jungfrau,
"Storm came on , thunder, lightning, hail, all in perfection and beautiful, I was on horseback the Guide wanted to carry my cane I was going to give it him when I recollected it was a Sword stick and I thought that the lightning might be attracted towards him kept it myself a good deal encumbered with it & my cloak as it was too heavy for a whip and the horse was stupid & stood still every other peal."
In a letter to Maria Gisborne of 6-10 April 1822, Mary Shelley described the "Pisan affray" of 24 March, in which Sergeant-Major Masi was pitch-forked by one of Byron's servants. She recounted how Byron rode to his own house, and got a sword stick from one of his servants.
Sword sticks came in all qualities, and for numerous purposes, from the simplest bamboo sword cane personal defender to stout customs officer’s ‘prod’, to offensive close quarter stiletto dagger canes and even to the other side of the world in the form of Japanese samurai’s shikome-sue, hidden swords.
We show two famous sword sticks in the gallery, one that belonged to Lord Byron, and another in a Presidential Centre Library collection, a historic sword stick is part of the Rutherford B. Hayes Presidential Centre Library collection in Fremont, Ohio from the Waggoner family, the sword-cane was said to have been presented to Mr Waggoner by General George Washington in honour of Waggoner's service in Washington's Life Guard during the American Revolutionary War.
But it was Louis XIII who brought the cane to importance as a royal accessory. The king, as his portraits depict, supposedly always held one in his hands. He also gave them – along with valuable snuffboxes – as gifts of honour. Accordingly, gentlemen who wanted to be fashionable never went without this accessory from that time on. At the time, these were sort of ornate rods without a curved handle that were held in the hand or carried under the arm.
The 19th century and the beginning of the 20th century became the age of the cane. The tremendous popularity then created the desire to be seen with a cane. And so a wealth of unique
pieces with practical and strange handles and a mysterious inner life were created. The painter
Henri de Toulouse-Lautrec, for example, owned a cane containing a bottle that held a pint of absinthe.
In the mid-18th century Saxony's prime minister, Heinrich Graf von Brühl, possessed 300 sticks to go with 300 suits, together with just as many snuffboxes which he wore in turn. King Friedrich II, too, had a huge collection of luxurious walking sticks and snuffboxes. After the Seven-Years War one particular type of stick, with a handle formed like a rope, which was King Friedrich’s constant companion, became so popular, that it was dubbed the "Fritz crutch".
Overall in very nice condition, the ivory hounds head has the usual natural use age cracking, and the blade some old surface pitting in some areas.
Ivory Declaration Submission
Antique ivory, 'worked' declaration submitted, we can sell this sword to collectors (over 18) within the UK, but it is not allowed for export. Ivory, however old, can be owned in the USA but cannot be imported into the USA read more
1495.00 GBP

Original German WWII 15cm Nebelwerfer 41 Inert Rocket. Original, WW2 German Third Reich 'Nebelwerfer 41' Un-Fired or Failed Detonation Rocket. D-Day 'Operation Overlord' Vintage
The German designation Nebelwerfer, (Smoke Launcher), was actually a camouflage term used to hide the development of rocket launchers which had been banned as a result of the Treaty of Versailles following the end of WWI. Under the camouflage term German armament firms continued development of rocket launchers which fired smoke or high explosive shells in direct violation of the Treaty. In 1941 the 15cm Nebelwerfer 41 was introduced and it would be come the standard weapon utilized by the Nebeltruppen. The Nebelwerfer 41 consisted of six firing tubes mounted on a two wheeled split trail carriage. The 15 cm Nebelwerfer 41 (15 cm NbW 41) was a German multiple rocket launcher used in the Second World War. It served with units of the Nebeltruppen, German Chemical Corps units that had the responsibility for poison gas and smoke weapons that were also used to deliver high-explosives during the war. The name Nebelwerfer is best translated as "smoke mortar". Allied troops nicknamed it Screaming Mimi and Moaning Minnie due to its distinctive sound.
Rocket development had begun during the 1920s and reached fruition in the late thirties. This offered the opportunity for the Nebeltruppen to deliver large quantities of poison gas or smoke simultaneously. The first weapon to be delivered to the troops was the 15 cm Nebelwerfer 41 in 1940, after the Battle of France, a purpose-designed rocket with gas, smoke and high-explosive warheads. It, like virtually all German rocket designs, was spin-stabilized to increase accuracy. One very unusual feature was that the rocket motor was in the front, the exhaust venturi being about two-thirds down the body from the nose, with the intent to optimize the blast effect of the rocket as the warhead would still be above the ground when it detonated. This proved to greatly complicate manufacture for not much extra effect and it was not copied on later rocket designs. It was fired from a six-tube launcher mounted on a towed carriage adapted from that used by the 3.7 cm PaK 36 and had a range of 6,900 meters (7,500 yd). Almost five and a half million 15 cm rockets and 6,000 launchers were manufactured over the course of the war.
Inert rocket example is dated 1944 and bears the manufacturer code emh. Round is approximately 37" tall constructed in steel with three main sections which can be taken apart with its inner workings present and waffenamt stamped. Overall condition is excellent with areas of minor pitting.
The Nebelwerfer 41, is unlimbered and placed in position by its crew of four men. As soon as the protective coverings have been removed, the projector is ready to be aimed and loaded. The ammunition is attached to the right and to the left of the projector, within easy reach, and the shells are introduced two at a time, beginning with the lower barrels and continuing upward. Meanwhile, foxholes deep enough to conceal a man in standing position have been dug about 10 to 15 yards to the side and rear of the projector. The gunners remain in these foxholes while the weapon is being fired by electrical ignition. Within 10 seconds a battery can fire 36 projectiles. These make a droning pipe-organ sound as they leave the barrels, and, while in flight, leave a trail of smoke. After a salvo has been fired, the crew quickly returns to its projectors and reloads them. Only its original empty steel shell casing and parts, no propellant, no ingnition system, thus completely safe in all regards.
No restrictions to ownership or personal display, but only for sale to over 18's. Generic photos from our stock
Not suitable to Export. UK mainland delivery only. 38 inches long approx.
Copy and paste for original film of Nebelwefer in use on youtube; https://www.youtube.com/watch?v=xtSTMYGEyaM
A similar example can be found at the Smithsonian National Air and Space Museum as seen at this link; Rocket, Surface-to-Surface, Nebelwerfer 15cm Wgr. 41 Spr. read more
895.00 GBP